BASIC WORKFLOWS
This section is long — read carefully so you can actually build a complete workflow by the end. Finishing something simple first, then leveling up, is always easier than starting with something too complex.
And if it gets too long, too exhausting to read — the easiest way is to copy & paste it to your AI Persona and ask them to brief it back to you (assuming you’ve already read that section and built yourself a proper AI Persona).
Hahah.

Workflow overview
The workflow runs on a schedule, pulls data in parallel from two sources — Supabase and the Meta Catalog API — merges them, grabs the latest prices and stock levels, then pushes everything straight up to Meta Catalog. Fully automated, no manual intervention needed.
Catalog ID — Go into Meta Business Manager and find your Catalog ID. Don’t sit there typing it digit by digit — screenshot it and paste to your AI Persona to read. (Meta doesn’t have a copy button for this. f*ck meta.)
Access Token — You need a valid Meta Access Token to call the Graph API. If you don’t know how to get one, your AI Persona will walk you through it.
Supabase table — Create a product table on Supabase, synced from the Google Sheet or Excel file you use to manage your product catalog. This table is the price and stock data source for the entire workflow.
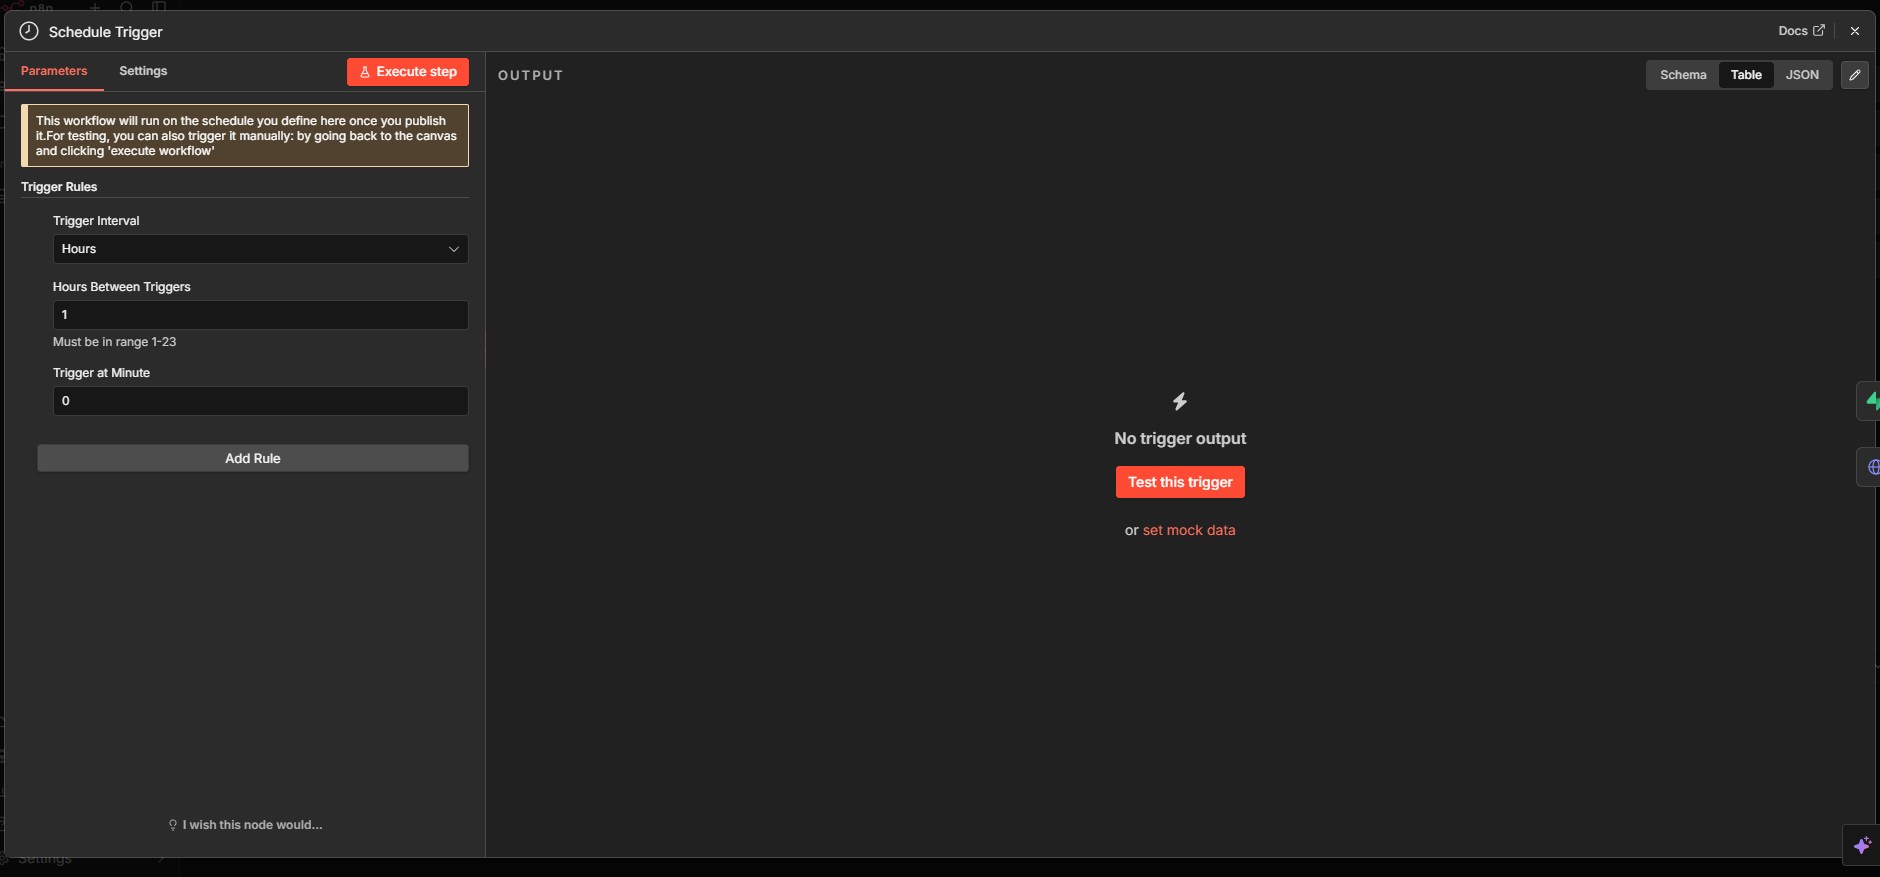
Node 1 — Schedule Trigger
Starts the workflow on a fixed schedule. No one needs to press anything — when the time comes, the workflow runs. Set to trigger every hour here to keep prices and stock on Meta Catalog as close to real-time as possible.

Node 2 — Get-Meta-Catalog (HTTP Request — GET)
Calls the Meta Graph API to fetch the full list of products currently in the catalog. The response contains each product’s retailer_id — this is the reference ID used to match against Supabase data in the next step. This node runs in parallel with Check-Supabase, independent of it.

Node 3 — Check-Supabase (Supabase — getAll)
Fetches all product data from Supabase — product codes, prices, stock levels. This is the most accurate data source because Supabase is synced from the internal system. This node runs in parallel with Get-Meta-Catalog — both pull data at the same time rather than waiting on each other sequentially.

Node 4 — Merge (append)
Combines the results from both parallel branches into a single stream. Append mode — keeps all items from both inputs, nothing gets dropped. After this step, the next node finally has everything it needs from both sources to do its job.

Node 5 — Get-Price-Stocks (Code)
The Code node handles the matching logic: takes the retailer_id from the Meta Catalog list, finds the corresponding product in Supabase data, and attaches the latest price and stock. Output is a clean list of products ready to be pushed to Meta. A Code node is used here because no built-in node can handle this cross-source matching logic.

Node 6 — Push-Price-Stock-Meta-Catalog (HTTP Request — POST)
Pushes all the processed price and stock data to Meta Catalog via the Graph API /batch endpoint. Sends a single request containing all products that need updating — much faster than calling the API one product at a time. After this node, Meta Catalog is up to date. You can now sit back, click Execute Workflow, and enjoy debugging it together with your AI Persona. (Heheh.)

Workflow overview
The workflow runs on a schedule, reads the product catalog from Google Sheets, filters price and stock data, then pushes in parallel to three places: Supabase (for the Meta Catalog workflow above to use), Shopee, and TikTok Shop. Fully automated, no manual steps.

Node 1 — Schedule Trigger
Starts the workflow on a fixed schedule. When the time hits, the entire pipeline runs — fetch, filter, push to all three platforms — without anyone touching it.

Node 2 — Refresh-Tokens (Code)
Refreshes both Shopee and TikTok Shop tokens at the same time before any API calls happen. Tokens expire — if you don’t refresh them regularly, the Push nodes downstream will throw authentication errors. This node makes sure everything is valid before the workflow moves forward.

Node 3 — Product Catalog (Google Sheets)
Reads the full product catalog from Google Sheets — product codes, prices, stock levels, Shopee IDs, TikTok IDs. This is the single source of truth. When prices or stock change, you update the sheet — the workflow syncs everything else automatically.
Data range: Specify exactly which row your actual data starts from. If rows 1–3 are headers and notes, set the range to start from row 4. n8n reads the right data, not the headers.

Node 4 — Filter-Price-Stock-ID (Code)
Filters and reformats the Google Sheets data into the exact structure each platform expects. Shopee and TikTok have different API request formats — this node prepares the right payload for each before the workflow splits into three parallel branches.

Node 5 — Push-Price-Stock-Supabase (HTTP Request — POST)
Pushes price and stock data to Supabase — this updates the central data source so the Meta Catalog Sync workflow above can read it and sync up to Meta. The two workflows share the same Supabase table.

Node 6 — Push-Shopee (HTTP Request — POST)
Calls the Shopee API to update price and stock for each product by product ID. This node runs in parallel with Push-TikTok and Push-Supabase — all three push at the same time, none waiting on the others.

Node 7 — Push-TikTok (HTTP Request — POST)
Calls the TikTok Shop API to update price and stock. TikTok is slightly more involved than Shopee — you need both the product ID and the product SKU ID, not just the product ID alone.
Product SKU ID: TikTok doesn’t display SKU IDs directly in the interface — you need a separate script to retrieve them via API. Ask your AI Persona, provide your access token, and they’ll give you the full script.

Workflow overview
The workflow runs every 4 hours, scans all videos on the channel, fetches new comments, uses AI to generate appropriate replies, then posts them automatically. No comment gets left behind no matter how many videos the channel has.
Anthropic Console — You need an Anthropic account and API key to use the Generate Reply node. If Sonnet feels too expensive, switch to Haiku — much lighter on cost. Don’t want to use Anthropic at all? The ChatGPT API works too, and the free tier is enough for a typical channel’s comment volume.

Node 1 — Schedule Trigger (every 4 hours)
The workflow runs every 4 hours — frequent enough that comments don’t go unanswered too long, but not so frequent that it risks hitting YouTube API rate limits.

Node 2 — Search-Channel (HTTP Request — GET)
Fetches the full list of videos on the channel from the YouTube Data API. This is the first step — the workflow needs to know which videos to scan for comments.

Node 3 — Split Out
Breaks the video list into individual items to process one by one. A channel with many videos can’t have all of them returned in a single API call — Split Out makes sure each video gets processed independently, none skipped.

Node 4 — Get-Comment (HTTP Request — GET)
Fetches the latest comments for each video from the YouTube API. The workflow processes one video at a time — gets its comments, handles them, then moves to the next video.

Node 5 — IF
Checks whether the video has any new comments. If yes, move forward to Generate Reply. If no, stop — nothing to do. This node prevents the workflow from making unnecessary AI API calls when there are no new comments to handle.

Node 6 — Generate-Reply (Anthropic)
Calls the Claude API to generate an appropriate reply for each comment. The node receives the comment content as input, the AI reads it and produces a natural reply based on the tone and persona defined in the system prompt. I use Sonnet 4.6 with AI Persona Cass — replies come out natural, friendly, nothing like a bot.

Node 7 — Post-Reply (HTTP Request — POST)
Posts the AI-generated reply to YouTube via the API. After this node, the comment has been replied to automatically — viewers see a response, the channel looks active, no comment sits there unanswered.